A Game A Month #1: Shoot’em Up using LibGDX
Welcome to my first attempt at making a game in a month! Thanks to the holidays I had some time to set this blog up and start working on my January-Game.
The first game will be a simple Shoot’em Up made with LibGDX, an open source multi-platform Java game framework. It’s a framework I used many times so far and which I know very well. I think that’s good for the start as the risk will be low that I wont finish it in time. I can focus mainly on the game itself and don’t have to learn things from the start.
The Game
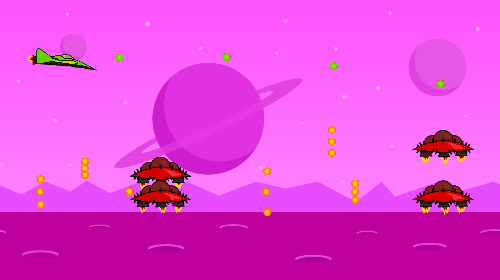
The goal is to make a simple endless sidescrolling Shoot’em Up in a cartoon style space/alien setting. The player controls the spaceship holding down one button (like in flappy bird) and has to shoot down attacking alien spaceships, surviving as long as possible, while the enemies will become more challanging with time. The GUI will show the current points and a life bar with the player’s ship state.
If we can implement this basic idea early, we might also add some items that are upgrading the ship of the player
The Engine and Tools
LibGDX provides everything needed in a 2D game. Audio and input handling, math and physics, a 2D particle system, tilemap support, a 2D UI library, OpenGL helpers like Shaders and even a high-level 3D-API. It is very easy to deploy a project as a desktop, android, iOS or Html5 application. There is no editor like in Unity or Godot, so you manually have to write code in Java. But there are some useful tools like a particle editor and a texture packer, which can make this task easier. After downloading and executing the LibGDX Setup App you have to open the project in your favourite Java editor. It is necessery to install the Java JDK.
Personally, I prefer to use IntelliJ for coding in Java. Setting up the project in IntelliJ is explained further down in the text. For creating some assets I will use Inkscape.
Summed up, the setup looks as follows:
- LibGDX Setup App
- Java JDK
- Editor: IntelliJ
- Graphics: Inkscape
What components we will focus on?
The game will feature follwing main components:
- Animated objects
- Scrolling parallax background with layers
- Object pooling
- Collision handling
- Playing sounds
- User Interface
LibGDX project setup with IntelliJ
The Setup App
To create a LibGDX project you have to execute the LibGDX Setup App. I checked “Desktop” and “Html” as it gives me the possibility to publish the game in the web later on. Besides, I chose “Tools” to have the option to add particle effects.
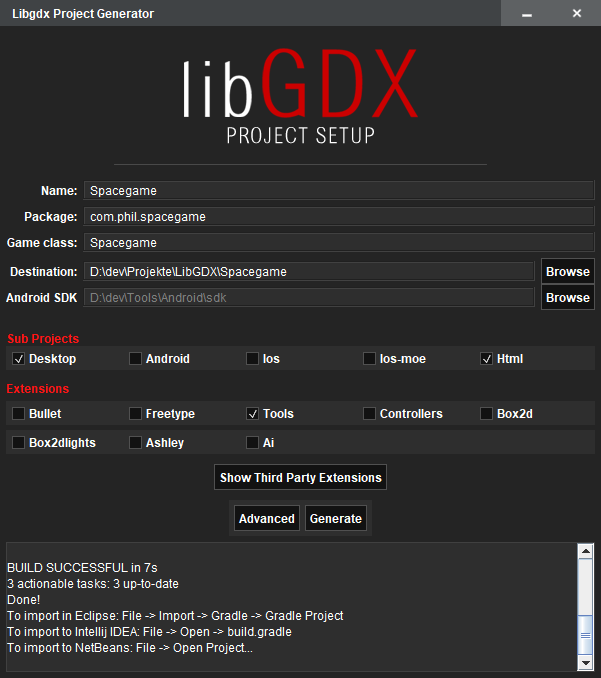
Make sure that the Java JDK is installed on your system.
Import to IntelliJ
To import the project to IntelliJ you have to click on “File > Open…”. Navigate to the project (here: Spacegame) and doubleclick on “build.gradle”. Confirm the next dialog with “Open as project“. In the following window make sure that the Java JDK is chosen. I prefer to check “Use auto-import”. Hit OK and wait a moment for Gradle to build the project.
Next, it is necessery to create the desktop launcher configuration. In the Project window go to “Spacegame > desktop > src > .. > DesktopLauncher. Rightclick this file and click on “Run ‘DesktopLauncher.main()’”. This will create a DesktopLauncher configuration. Don’t panic, we will fix the error that should show up now.
The last step is to link the assets folder with the project. Go to the “Run” menu and click “Edit Configurations…”. Choose “DesktopLauncher” on the left. In the “Configuration” tab, fill the “Working directory” attribute with the path to the core/assets folder. In my case “D:\dev\Projekte\LibGDX\Spacegame\core\assets”.
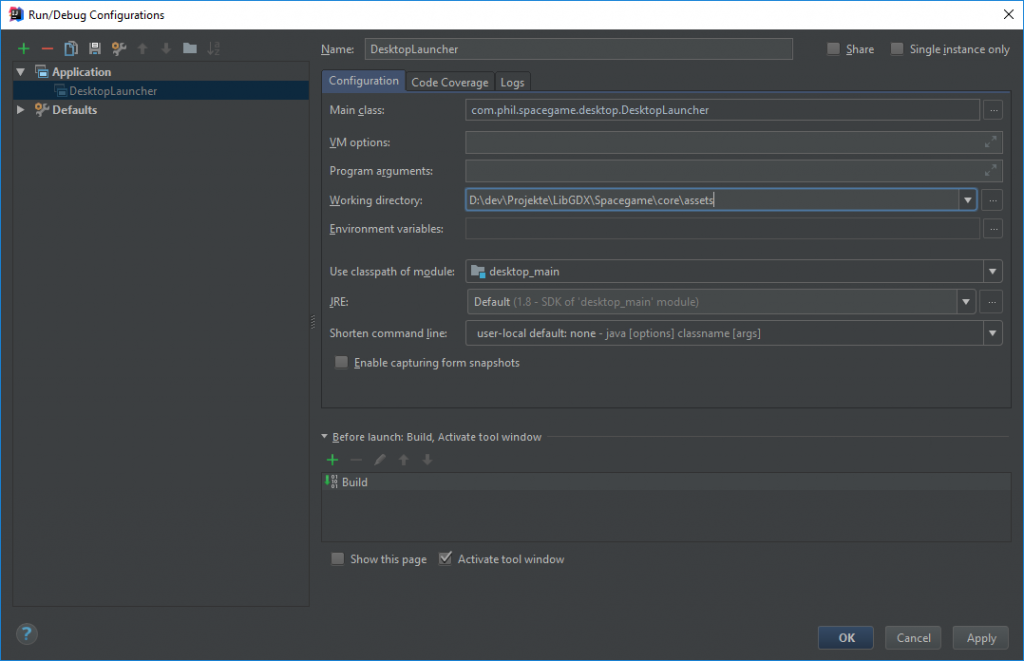
Now it should be possible to run the application hitting the green arrow on the top-right corner.
Everything happens in the “core” module. Spacegame.java is the starting point. In the “desktop” module you can find the launcher file for the desktop application of your game. It does nothing more than loading Spacegame.java. If we would have chosen the android module in the setup app, it would also have an own folder with a launcher file.
You should check out the documentation for more information about setting up projects (in IntelliJ, Eclipse, Netbeans) and more stuff.
Some good tutorials on LibGDX are:
- GamesFromScratch.com
- And on GamesFromScratch on YouTube
A LibGDX Game Template
Since I worked with libGDX already, I have a template which I reuse often. You can clone it from Github or download it right here:
You can import it in IntelliJ like described above. Don’t forget to link the assets folder.
The template project consists of two Screens: a loading screen (LoadingScreen.java) and the gameplay screen (GameplayScreen.java). The base class and the starting point for the LoadingScreen is GdxGame.java. The loading screen is shown as long as the asset manager (Resources.java) is loading the asset files. There is also a basic input class (GameInput.java) and a class for creating 2D animations (AnimatedSprite.java). GUI elements like fonts and buttons (Scene2D elements) can be implemented in GUIStage.java
Gameplay.java is the starting point for adding gameplay code. It loads an example animation. Feel free to download and to test the project.
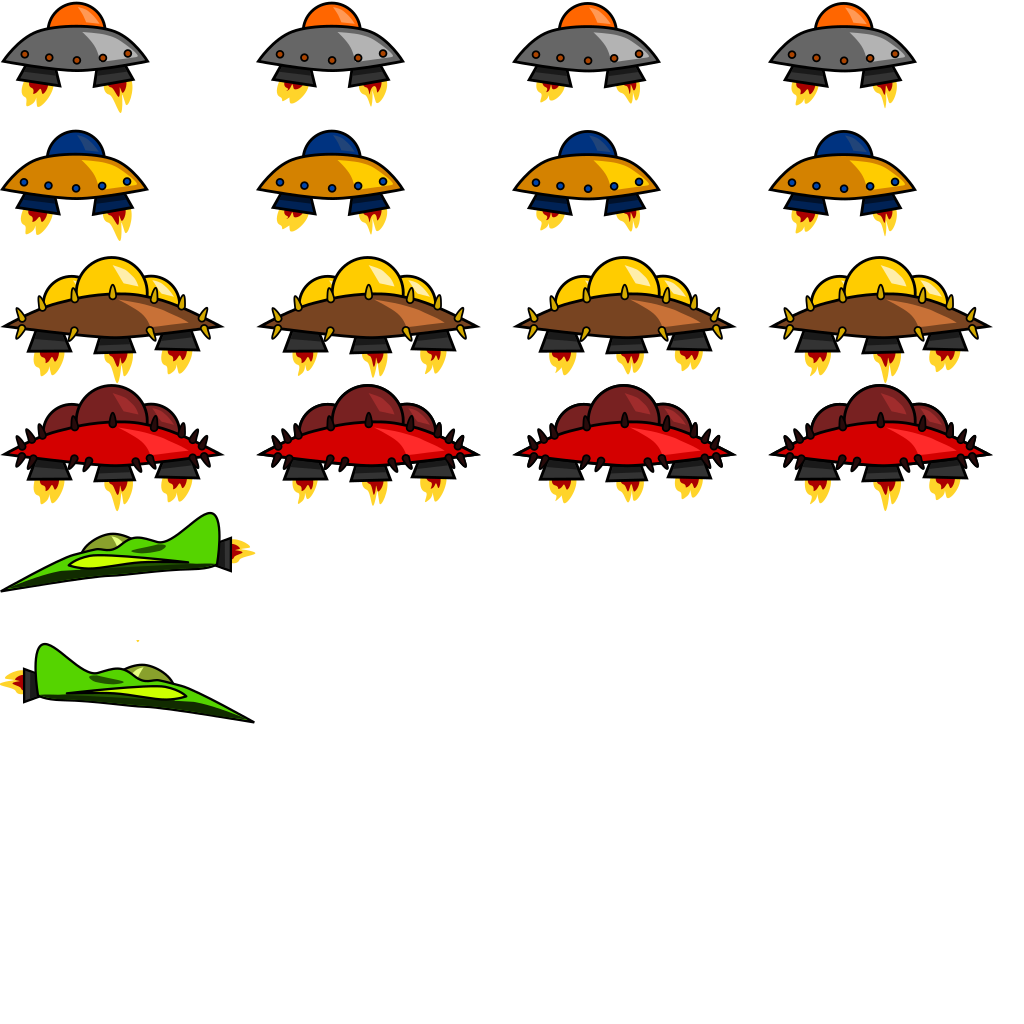
The template includes this tileset with spaceship animations I made some time ago:
Shoot’em Up Code Structure
Now back to our “Spacegame”. It’s time to describe how the code will be structured.
The GameplayScreen (GameplayScreen.java) will manage the user input (GameInput.java), the GUI (GUIStage.java) and the gameplay. Gameplay.java is the class where the actual game will happen – creating, updating and drawing the background, the player, the enemies and reacting to collisions and input.
The following diagram shows just the basic structure of the gameplay components. Of course, we will add more classes later on.
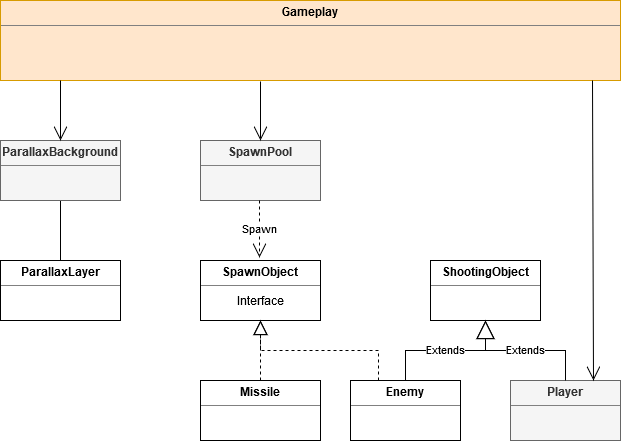
As the player and the enemies will have nearly the same functionalities, namely beeing animated, shooting and being shot, there will be a base class (ShootingObject.java) which Player.java and Enemy.java will inherit from. ShootingObjects will spawn missiles (Missile.java).
To take care of the Java garbage collector, we will use object pooling. We will not create a new instance of an enemy or a missile every time when a new one has spawned, but reuse objects that are “dead”. Therefore we need a spawn pool (SpawnPool.java) which manages all spawn objects. A SpawnObject.java interface will be needed for the enemies and missiles. ParallaxBackground.java handles the scrolling background layers (ParallaxLayer.java).
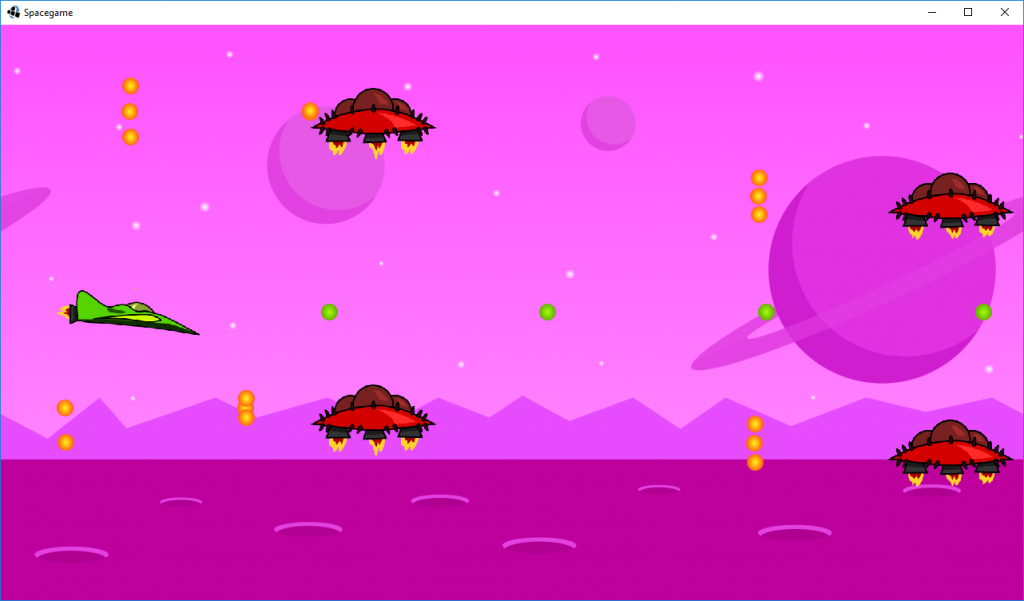
Current progress
Finally, it’s time to show how the actual state of the game looks like. The background movement, spawn pooling and collisions are working well so far. But there are still many things to do. For example the GUI, a menu, more enemies … But hey, it’s a playable state!
Get the sourcecode on Github or download it right here:
That’s all for now!
In the next blogpost I will dive deeper into the code and show how loading resources, using animations, background movement, object pooling and collisions work. It is also planned to make a short how-to for the assets I created with Inkscape in a future blogpost. I’m really excited to show you some progress! Don’t forget to follow me on Twitter to get updates! See you soon!